
GraphQL and SF4
Ever heard of GraphQL?
GraphQL is a query language, fit for the website concept of data. It gives clients the power to ask for exactly what they need and nothing more. You can check the graphql website.
Why GraphQL and not REST? I dunno really, I think both have their pros and cons, you can find on medium a lot of stories about benchmarking, how and why teams used graphql etc.
Last thing about GraphQL is that it works perfectly with node. In the doc you can build a GraphQL relay / server and start creating your api.
Here’s what you need to understand about GraphQL :
- Unlike a REST API, the GraphQL API has only one POST endpoint (ex : https://yoursite/graphql ).
- In GraphQL you can query data, or mutate (=update) data. These 2 concepts are : Query and Mutation.
- You need to define your schema (as a GraphQL Schema) for all your entities (ex: Post, Comment, Like, User etc).
Let’s not dig deep with the theory and let’s move to the SF4 implementation.
GraphQL and Symfony4 API : a piece of cake
SF4 is an amazing PHP framework, complying with the PSR-, using the Doctrine ORM and so much cool stuff. I will assume that you already know what are the basics of Symfony. Now some of you never used a backend Symfony project as an API. By API, I mean that the backend is reachable by any of your frontends (mobile, PWA, React etc.) as a remote API. Usually, we use TWIG as a front with SF or Encore (<3) for webpack, which is also very nice. Now that our backend is remote, you will have to secure it in a different manner than you did with the PHP SESSID, AKA sessions. We will use for example Json Web Tokens .
For REST, you may know the fabulous project Api-Platform (with a graphQL extension also). We will use Overblog GraphQL Bundle at version ^0.11.12. It is an amazing project that provides you a very cool graphQL server for Symfony. It uses also the Webonyx/GraphqlPHP, the GraphQL PHP reference today.
I used it for one big project of mine, and I must say THANK YOU GUYS for provinding this Open Source gem <3.
I came looking for copper and i found gold, Christopher Columbus.
Humhum, let’s not heat the oven up, and put ourselves to work step by step.
Completely secured & working API with Symfony - JWT - GraphQL
I am not fan of showing only the graphQL behavior with Symfony. If you know what are the concepts of an API (JWT, login, registration etc) you can jump like a beatiful kangouroo to the GraphQL implementation.
1) Devops :
Lets starts with the environnement. Should we use Docker? Wamp? Lamp? Xamp? Samp? Namp? Tamp? I will show you two different ways of deployment (one with Docker, one without).
With Docker and Docker-compose :
You’ll obviously need Docker and Docker-compose on your local env. Here lays an example of docker-compose.yml :
version: "3"

services:

# ------> adminer ------>
    adminer:
        container_name: adminer
        image: adminer:latest
        restart: always
        environment:
            ADMINER_PLUGINS: tables-filter tinymce
            ADMINER_DESIGN: pepa-linha
        ports:
            - 8080:8080
# <------ adminer <------

# ------> composer ------>
    composer:
        container_name: composer
        image: composer:latest
        volumes:
            - ./:/app
        command: ["composer", "update"]
# <------ composer <------

# ------> postgres ------>
    postgres:
        container_name: postgres
        image: postgres:latest
        restart: always
        environment:
            POSTGRES_USER: app
            POSTGRES_PASSWORD: root
            POSTGRES_DB: mydb
        volumes:
            - backer-db-data:/var/lib/postgresql/data
        ports:
            - 5432:5432
# <------ postgres <------

# ------> symfony ------>
    symfony:
        container_name: symfony
        build: ./docker/symfony
        image: skyflow/symfony
        restart: always
        working_dir: /webapp
        ports:
            - 80:80
        volumes:
            - ./:/webapp
            - ./docker/symfony/conf/apache2:/etc/apache2
            - ./docker/symfony/conf/php7/php.ini:/etc/php7/php.ini
# <------ symfony <------
Explanation : The adminer part is optional as you can access your admin DB with HeidiSQL or some eq. As for Symfony, I used a built version of apache2 php (from a friend of mine), but you can easy build something equivalent.
Now you can run docker-compose up and use your composer container to generate a symfony 4 project :
docker-compose exec composer create-project symfony/website-skeleton my-api
The website skeleton will pull all the depedencies for a complete website (eg: twig, doctrine, etc). You can clean what you don’t want in your API in your composer.json of course.
Without Docker :
Now for another way of deploying your Symfony app you’ll need to have PHP >=^7.1, PGSQL (> 9.x) and composer. It’s very easy to install (even on Windows) and thanks to composer you can run:
composer create-project symfony/website-skeleton my-api
Common configurations for .env.local & postgres:
We will need to perform a few changes before creating our entities etc.
In your SF4 project directory there should be a .env, .env.dist, .env.local. What will we use for our local development ? .env.local.
#.env.local

APP_ENV=dev
APP_SECRET=thefamoussecretkeylol
DB_TYPE=postgres
DB_USER=app
DB_PASS=root
DB_ADDRESS=127.0.0.1
DB_PORT=5432
DB_NAME=mydb
DATABASE_URL=${DB_TYPE}://${DB_USER}:${DB_PASS}@${DB_ADDRESS}:${DB_PORT}/${DB_NAME}

CORS_ALLOW_ORIGIN=^https?://localhost(:[0-9]+)?$

MAILER_URL=null
Everything looks great. Of course you’ll have to adapt the DB ids to yours.
As we are using postgres, you’ll need to change the doctrine dbal driver :
# config/packages/doctrine.yaml

doctrine:
  dbal:
    driver: 'pdo_postgresql'
    server_version: '10.5'
    charset: utf8
    default_table_options:
      charset: utf8
      collate: utf8_unicode_ci

    url: '%env(resolve:DATABASE_URL)%'
For the non-docker env users :
You can now start your symfony app with php bin/console server:run !
No need for Apache, Active Directory, and all the pain with the php.ini.
Easy stuff isn’t it?
2) The JWT authentication :
Enough with the settings ladies & gentlemen. Let’s secure our future graphQL API. But before rushing deeply into the JWT implementation let’s create a User entity and persist it. The maker bundle is mandatory for this command.
php bin/console make:user
Don’t forget to d:s:u and now we have our User entity.
The JWT token : Login and Registration :
JWT - Json Web Token - allows you to secure data between two parties. This is exactly what we need for our API. For Symfony we have an amazing bundle made by Lexik very easy to deploy and well documented.
First we’ll add the dependency :
composer require "lexik/jwt-authentication-bundle"
Then generate the SSH keys :
mkdir config/jwt
openssl genrsa -out config/jwt/private.pem -aes256 4096
openssl rsa -pubout -in config/jwt/private.pem -out config/jwt/public.pem
Remember the passphrase you used because you’ll need it ;).
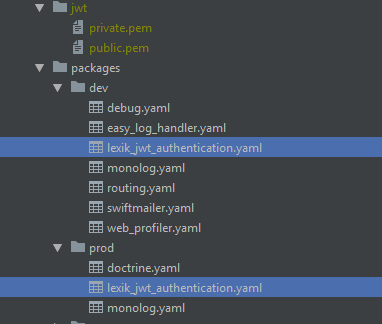
To have proper dev and prod working environnement, I created a lexik_jwt_authentication.yaml file in config/packages/dev and config/packages/prod.
# config/packages/dev/lexik_jwt_authentication.yaml
lexik_jwt_authentication:
    secret_key: '%env(resolve:JWT_SECRET_KEY)%'
    public_key: '%env(resolve:JWT_PUBLIC_KEY)%'
    pass_phrase: '%env(JWT_PASSPHRASE)%'
    user_identity_field: username
# config/packages/prod/lexik_jwt_authentication.yaml
lexik_jwt_authentication:
    secret_key: '%env(JWT_SECRET_KEY)%'
    public_key: '%env(JWT_PUBLIC_KEY)%'
    pass_phrase: '%env(JWT_PASSPHRASE)%'
    user_identity_field: username
I used Heroku for production. You can easily have a CD with Heroku by hook with your master branch or a dedicated one. Don’t forget to define the JWT environnement variables : JWT_SECRET_KEY, JWT_PUBLIC_KEY, JWT_PASSPHRASE.
Now, let’s add some firewalls (registration, login and API) :
# config/packages/security.yaml
security:
    encoders:
       App\Entity\User:
            algorithm: argon2i

    # https://symfony.com/doc/current/security.html#where-do-users-come-from-user-providers
    providers:
        # used to reload user from session & other features (e.g. switch_user)
        app_user_provider:
            entity:
                class: App\Entity\User
    firewalls:
        dev:
            pattern: ^/(_(profiler|wdt)|css|images|js)/
            security: false
        login:
            pattern:  ^/login
            stateless: true
            anonymous: true
            json_login:
                check_path: /login
                username_path: username
                success_handler:          lexik_jwt_authentication.handler.authentication_success
                failure_handler:          lexik_jwt_authentication.handler.authentication_failure
        api:
            pattern:   ^/graphql/
            stateless: true
            anonymous: false
            provider: app_user_provider
            guard:
                authenticators:
                    - lexik_jwt_authentication.jwt_token_authenticator

        register:
            pattern:  ^/register
            stateless: true
            anonymous: true

    access_control:
        - { path: ^/login, roles: IS_AUTHENTICATED_ANONYMOUSLY }
        - { path: ^/register, roles: IS_AUTHENTICATED_ANONYMOUSLY }
The register firewall allows an anonymous access.
The login firewall works the same way than the register but it will go through our JWT bundle handler.
The api firewall is basically the graphql route : we need our user to be fully authenticated (we can also add it in the access_control area) and to secure it, we have the guard authenticator “JWT token authenticator”.
This is not graphQL yet ! Indeed the register and login are regular Symfony routes. We can use graphQL with REST in the same project, depending on your needs.
Now we append the routes :
# config/routes.yaml

login:
  path:     /login
  methods:  [POST]

register:
  path: /register
  controller: App\Controller\ApiController::register
  methods: POST
As you can see, the Lexik JWT Bundle is handling by itself the login method (no need to add it in the controller). For the registration, we will do it by ourselves :
  //Controller/ApiController

 public function register(
        Request $request,
        UserPasswordEncoderInterface $encoder,
        JWTTokenManagerInterface $JWTManager,
        ValidatorInterface $validator,
        \Swift_Mailer $mailer
    ) {

        $em = $this->getDoctrine()->getManager();

        $data = json_decode($request->getContent());

        $user = $em->getRepository(User::class)->findOneBy(['username' => $data->username]);

        if($user || $em->getRepository(User::class)->findOneBy(['email' => $data->email]) ) {
            $response = new JsonResponse(["error" => 'Account already exist']);
            return $response->setStatusCode(409);
        }

        $user = new User();

        $user->setUsername($data->username);
        $user->setPassword($encoder->encodePassword($user, $data->password));
        $user->setEmail($data->email);

        $errors = $validator->validate($user);

        if (count($errors) > 0) {
            $errorsString = (string) $errors;
            $response = new Response($errorsString);
            $response->setStatusCode(400);
            return $response ;
        }

        $em->persist($user);
        $em->flush();

        $message = (new \Swift_Message('Welcome to the website'))
            ->setFrom('no-reply@website.com')
            ->setTo($user->getEmail())
            ->setBody(
                $this->renderView(
                    'api/registration.html.twig',
                    ['name' => $user->getUsername()]
                ),
                'text/html'
            )
        ;

        $mailer->send($message);

        return new JsonResponse(['token' => $JWTManager->create($user)]);
    }
Nothing weird in this Register method : we have the $data = json_decode($request->getContent()); which get the Json data from the front-end machine, and if you want to work with php arrays you can use the ->toArray() method.
We check then if the email already exists (we can add some password strenght validators), then we persist and flush.
I’ve added an emailing registration example, which can be easily implemented into your app and improves the UX / Security.
Last but not least, we return a new JsonResponse with the Json Web Token freshly created, thanks to the $JWTManager->create($user).
Wait? That’s it?
Yup. We are set for our registration / login part. But what data could we send in this Token? Our client will decode the token and use it for example to display some data or query posts.
The JWT token : An Event Listener example :
Let’s assume we need the picture URL and the user ID. We need to add these sets of key=>value into the JWT token.
Thanks to Lexik, we can use the EventListner JWTCreatedListener .
<?php
//src/EventListener
/**
 * Created by PhpStorm.
 * User: younesdiouri
 * Date: 01/03/2019
 * Time: 18:04
 */
namespace App\EventListener;
use App\Entity\User;
use Lexik\Bundle\JWTAuthenticationBundle\Event\JWTCreatedEvent;
use Symfony\Component\HttpFoundation\RequestStack;
use Symfony\Component\Security\Core\User\UserInterface;

class JWTCreatedListener
{
    /**
     * @var RequestStack
     */
    private $requestStack;

    /**
     * @param RequestStack $requestStack
     */
    public function __construct(RequestStack $requestStack)
    {
        $this->requestStack = $requestStack;
    }

    public function onJWTCreated(JWTCreatedEvent $event)
    {
        $request = $this->requestStack->getCurrentRequest();
        $payload = $event->getData();
        /** @var User $user */
        $user = $event->getUser();

        if (!$user instanceof UserInterface) {
            throw new \Exception('Does not match user interface', 500);
        }

        $payload['id'] = $user->getId()->toString();
        $payload['pictureUrl'] = $user->getPictureUrl();
        $event->setData($payload);
    }
}
This listener will listen (as expected) to the JWT created event. The $payload is the data stored by the JWT Token.
The most important code block is $user = $event->getUser(). Why?
We need to minimize going back and forth between our server and our database. A good API should give a quick response to the client, thus using wisely the cache etc.
In this case, we are getting the user from the server cache, and not querying the DB (with the $em).
Finally, we append the $user->getId() and $user->getPicTureUrl() to the payload.
The JWT token : How to simulate a client :
You can use curl from a bash or a far more better UI with Postman.
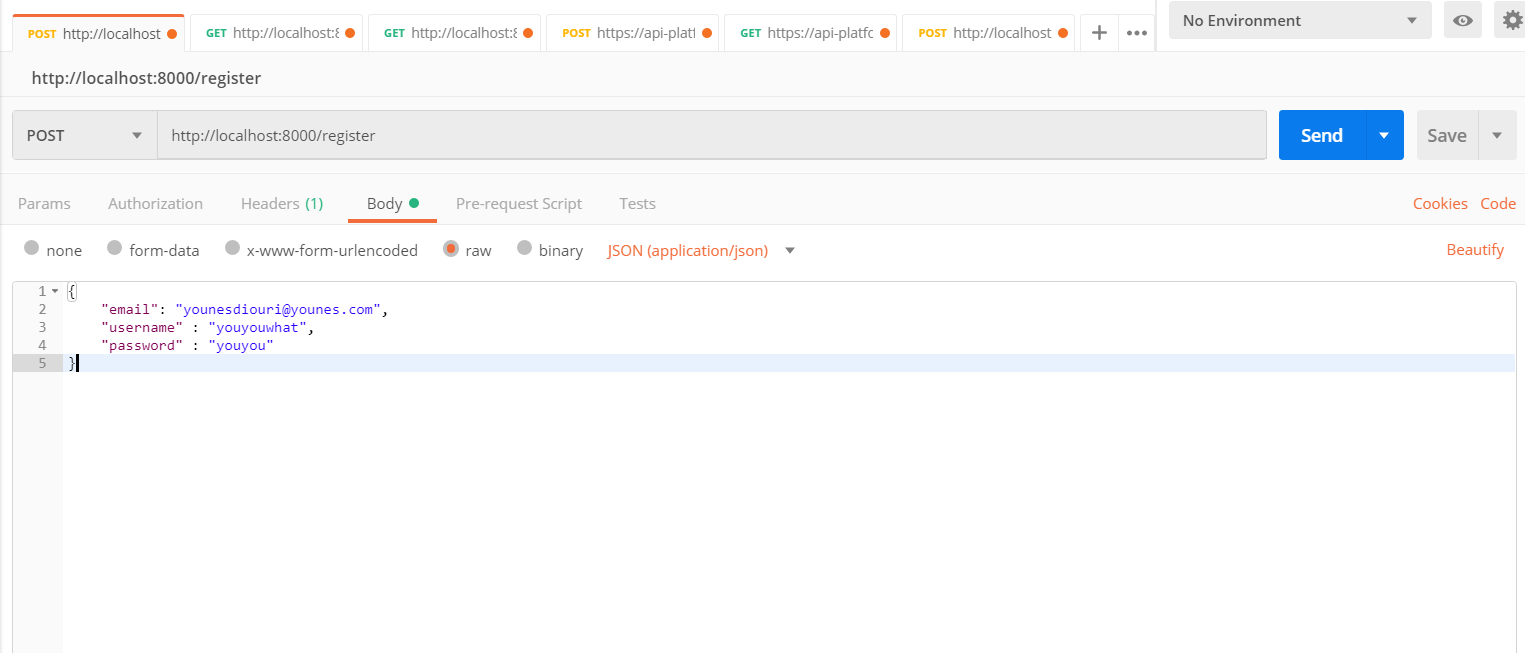
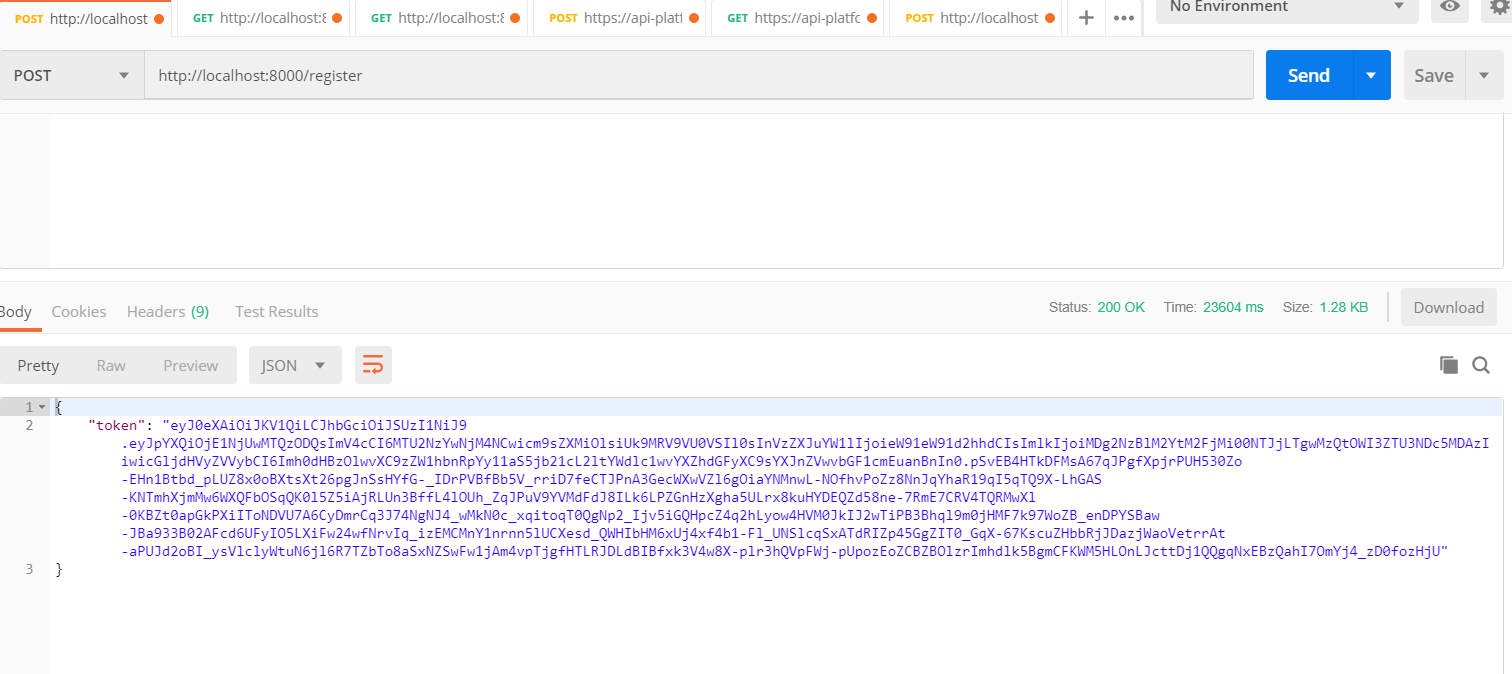
Easily I can register by sending this POST request with a specific header : Content-Type = application/json. I will receive a token in response with all the data I need.
You can access some protected routes by using this token. Let’s assume that our endpoint /api/private is protected (in the security.yaml),
we can reach this route with postman by filling the Authorization header :
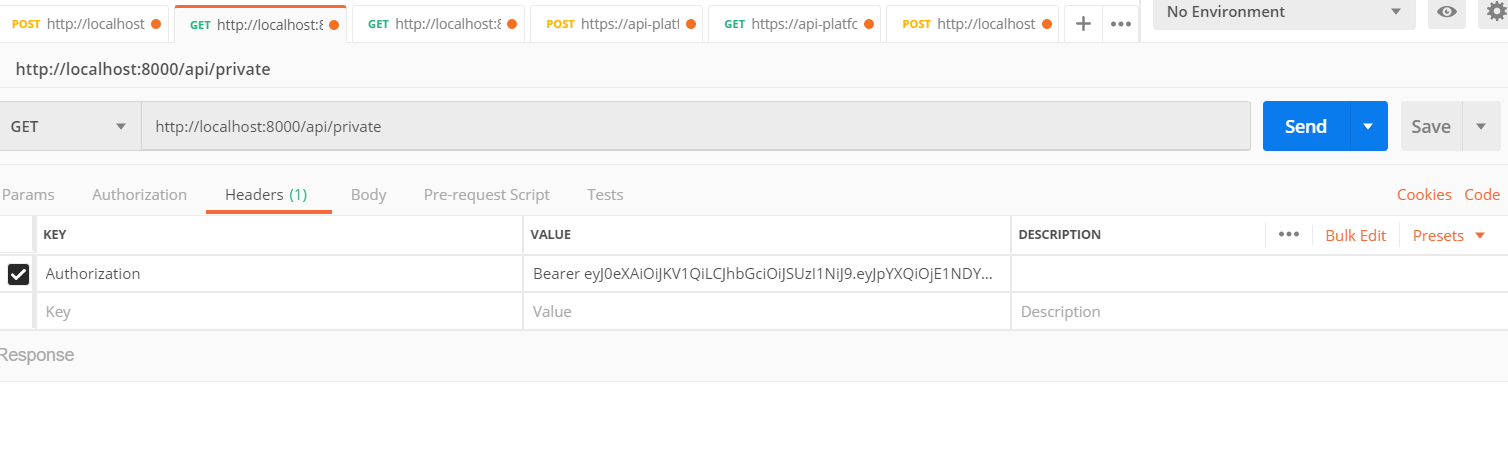
You can notice the Bearer word before the token. It is mandatory to put Bearer + Space + Token for the Authorization key.
We’ll see (maybe :)) in another topic how to use this JWT token with React (and also with react-apollo for GraphQl).
2) GraphQL implementation:
Alright folks, we finally reached our main topic. We’ll see here the main components of Overblog/GraphQL at version ^0.11.12:
- How to create a graphQL scheme with multiple types
- Resolvers
- Mutations
Overblog : Define your graphQL schema
First of all we’ll need to install the bundle via composer :
composer require overblog/graphql-bundle
You’ll notice a new file in your config/packages/ directory named graphql.yaml.
overblog_graphql:
    definitions:
        schema:
            query: Query
            mutation: Mutation
        mappings:
            auto_discover: false
            types:
                -
                    type: yaml
                    dir: "%kernel.project_dir%/config/graphql/types"
                    suffix: ~
Quick explanation: We’ll use for graphQL queries a Query.types.yaml file and for mutation Mutation.yaml. You can use either yaml or graphql extension format.
Before defining our types, we’ll assume that our User has some Posts (content, author, publishedAt) and our posts some Hashtags to cover all scenarios.
First, create a Post entity with php bin/console make:entity and add a Many To One association between posts and user.
Do the same for a Hashtag entity and we’ll add a Many To Many association between hashtags and posts.
Let’s get it back on track. Here is the User / Post / Hashtag type examples :
#config/graphql/types/User.types.yaml
User:
  type: object
  config:
    resolveField: '@=resolver("App\\GraphQL\\Resolver\\UserResolver", [info, value, args])'
    fields:
      email:
        description: "Email of the user"
        type: String
      username:
        description: "Username of the user"
        type: String
      pictureUrl:
        description: "Picture URL of the user"
        type: String
      posts:
        description: "Post collection of the user"
        type: PostConnection
        argsBuilder: Relay::ForwardConnection
#config/graphql/types/PostConnection.types.yaml
PostConnection:
  type: relay-connection
  config:
    nodeType: Post!
#config/graphql/types/Post.types.yaml
Post:
  type: object
  config:
    resolveField: '@=resolver("App\\GraphQL\\Resolver\\PostResolver", [info, value, args])'
    fields:
      postId:
        description: "Id of the post"
        type: String
      content:
        description: "Content of the post"
        type: String
      publishedAt:
        description: "Publication date of the post"
        type: String
      author:
        description: "User author of the post"
        type: User
      hashtags:
        description: "Hashtags of this post"
        type: "[Hashtag]"
#config/graphql/types/Hashtag.types.yaml
Hashtag:
  type: object
  config:
    resolveField: '@=resolver("App\\GraphQL\\Resolver\\HashtagResolver", [info, value, args])'
    fields:
      name:
        description: "Hashtag value"
        type: String
      count:
        description: "Number of posts for the hashtag"
        type: Int
      posts:
        description: "Posts related to the hashtag"
        type: HashtagPostConnection
        argsBuilder: Relay::ForwardConnection
#config/graphql/types/HashtagPostConnection.types.yaml
HashtagPostConnection:
  type: relay-connection
  config:
    nodeType: Post!
Explanation ![]() :
:
In the UserType, resolveField: '@=resolver("App\\GraphQL\\Resolver\\UserResolver", [info, value, args])' : we are defining the file path for our UserResolver (very close to a “Controller” for a basic Symfony App).
  posts:
    description: "Post collection of the user"
    type: PostConnection
    argsBuilder: Relay::ForwardConnection
To query the UserPosts, we are using a PostConnection.
Relay’s support for pagination relies on the GraphQL server exposing connections in a standardized way.
To use pagination, simplify lazy loading (especially for User Posts !), we are using a graphql connection, thanks to our graphQL server.
That’s why we have the config/graphql/types/PostConnection.types.yaml file for our User => Post connection. We can notice that for Post => User, there is no connection because it’s not necessary at all.
  hashtags:
    description: "Hashtags of this post"
    type: "[Hashtag]"
It goes the same for Hashtags. Posts does not contain that many hashtags, so we can use the [Hashtag] type (array of hashtags). However, one Hashtag will be related to many posts, thus we used a relay Connection for pagination.
Alright ! Now that we have all our types, let’s not forget the query type. As you may know (or not), a graphQL query goes with this syntax :
query{
  entity(param: something){
      attribute1,
      attribute2,
      etc.
  }
}
We did all the job for our entities, now let’s edit the config/graphql/types/Query.types.yaml :
# config/graphql/types/Query.types.yaml
Query:
  type: object
  config:
    fields:

      user:
        type: User
        args:
          username:
            type: String
        resolve: '@=resolver("App\\GraphQL\\Resolver\\UserResolver::resolve", [args["username"]])'

      post:
        type: Post
        args:
          id:
            type: ID
        resolve: '@=resolver("App\\GraphQL\\Resolver\\PostResolver::resolve", [args["id"]])'

      hashtag:
        type: Hashtag
        args:
          name:
            type: String
        resolve: '@=resolver("App\\GraphQL\\Resolver\\HashtagResolver::resolve", [args["name"]])'
We now have documentation for our Users, Posts and Hashtags.
Last step before testing our queries : the resolvers ![]() !
!
Overblog : The resolvers :
First the UserResolver :
<?php

// src/GraphQL/Resolver/UserResolver.php

namespace App\GraphQL\Resolver;

use App\Entity\User;
use App\Repository\UserRepository;
use Doctrine\ORM\EntityManagerInterface;
use GraphQL\Type\Definition\ResolveInfo;
use Lexik\Bundle\JWTAuthenticationBundle\Services\JWTTokenManagerInterface;
use Overblog\GraphQLBundle\Definition\Argument;
use Overblog\GraphQLBundle\Definition\Resolver\ResolverInterface;
use Overblog\GraphQLBundle\Relay\Connection\Output\Connection;
use Overblog\GraphQLBundle\Relay\Connection\Paginator;
use Symfony\Component\Security\Core\Authentication\Token\Storage\TokenStorageInterface;

class UserResolver implements ResolverInterface
{

    const HIDDEN_MAIL = 'hidden';

    /**
     * @var EntityManagerInterface
     */
    protected $em;
    protected $jwtManager;
    protected $tokenStorageInterface;
    protected $userRepository;

    /**
     * UserResolver constructor.
     * @param EntityManagerInterface $em
     * @param TokenStorageInterface $tokenStorageInterface
     * @param JWTTokenManagerInterface $jwtManager
     * @param UserRepository $userRepository
     */
    public function __construct(
        EntityManagerInterface $em,
        TokenStorageInterface $tokenStorageInterface,
        JWTTokenManagerInterface $jwtManager,
        UserRepository $userRepository
    ) {
        $this->em = $em;
        $this->jwtManager = $jwtManager;
        $this->tokenStorageInterface = $tokenStorageInterface;
        $this->userRepository = $userRepository;

    }

    /**
     * @param ResolveInfo $info
     * @param $value
     * @param Argument $args
     * @return mixed
     */
    public function __invoke(ResolveInfo $info, $value, Argument $args)
    {
        $method = $info->fieldName;
        return $this->$method($value, $args);
    }

    /**
     * @param string $username
     * @return User
     */
    public function resolve(string $username)
    {
        return $this->em->getRepository(User::class)->loadUserByUsername($username);
    }

    /**
     * @param User $user
     * @return string
     */
    public function email(User $user) :string
    {
        if(!$this->isUser($user)) return UserResolver::HIDDEN_MAIL;
        return $user->getEmail();
    }

    /**
     * @param User $user
     * @return string
     */
    public function username(User $user) :string
    {
        return $user->getUsername();
    }

    /**
     * @param User $user
     * @return string
     */
    public function pictureUrl(User $user) :string
    {
        return $user->getPictureUrl();
    }

    /**
     * @param User $user
     * @param Argument $args
     * @return Connection|null
     */
    public function posts(User $user, Argument $args)
    {

        $posts = $user->getPosts();
        $paginator = new Paginator(function ($offset, $limit) use ($posts) {
            return $posts->slice( $offset, $limit ?? 10);
        });

        return $paginator->auto($args, count($posts));
    }

    /**
     * Return true if the queried user is the current user.
     * @param User $user
     * @return bool
     */
    private function isUser(User $user)
    {
        $decodedJwtToken = $this->jwtManager->decode($this->tokenStorageInterface->getToken());

        return ($user->getId() == $decodedJwtToken["id"]);
    }
}
For each field I’ve defined in my User graphQL type, I have to create the associated method that will map this with my User Entity. Now I want to secure also my User emails : why?
As my backend behaves like an api, everyone can use their token to hit my graphQL endpoint.
Some basic rules to avoid being hacked easily :
- Don’t use incremented ID’s, but UUID (Ramsey\Uuid\Doctrine\UuidGenerator)
- hide the sensitive data
In our case, we’ll send “hidden” instead of the real email if query other users than ourselves (example : profile pages). We used this block :
private function isUser(User $user)
{
    $decodedJwtToken = $this->jwtManager->decode($this->tokenStorageInterface->getToken());

    return ($user->getId() == $decodedJwtToken["id"]);
}
We decode the User ID from our Token (we added the ID to the payload in the JWT part), and we compare it to the User ID we want to query.
public function email(User $user) :string
{
    if(!$this->isUser($user)) return UserResolver::HIDDEN_MAIL;
    return $user->getEmail();
}
Now for the email, we are returning a “hidden” String instead of the real email, if the resource ID is different from the request token ID.
Post and User are pratically the same :
 <?php

namespace App\GraphQL\Resolver;

use App\Entity\Post;
use App\Entity\User;
use App\Repository\HashtagRepository;
use App\Repository\PostRepository;
use App\Repository\UserRepository;
use Doctrine\Common\Collections\ArrayCollection;
use Doctrine\Common\Collections\Collection;
use Doctrine\ORM\EntityManagerInterface;
use GraphQL\Type\Definition\ResolveInfo;
use Lexik\Bundle\JWTAuthenticationBundle\Services\JWTTokenManagerInterface;
use Overblog\GraphQLBundle\Definition\Argument;
use Overblog\GraphQLBundle\Definition\Resolver\ResolverInterface;
use Symfony\Component\Security\Core\Authentication\Token\Storage\TokenStorageInterface;
use Overblog\GraphQLBundle\Relay\Connection\Output\Connection;
use Overblog\GraphQLBundle\Relay\Connection\Paginator;

class PostResolver implements ResolverInterface
{
    /** @var string POST_DATE_FORMAT */
    const POST_DATE_FORMAT = 'Y-m-d H:i:s';

    protected $em;
    protected $userRepository;
    protected $jwtManager;
    protected $tokenStorageInterface;
    protected $posts;
    protected $hashtagRepository;

    /**
     * PostResolver constructor.
     * @param EntityManagerInterface $em
     * @param UserRepository $userRepository
     * @param PostRepository $posts
     * @param HashtagRepository $hashtagRepository
     * @param TokenStorageInterface $tokenStorageInterface
     * @param JWTTokenManagerInterface $jwtManager
     */
    public function __construct(
        EntityManagerInterface $em,
        UserRepository $userRepository,
        PostRepository $posts,
        HashtagRepository $hashtagRepository,
        TokenStorageInterface $tokenStorageInterface,
        JWTTokenManagerInterface $jwtManager,
    ) {
        $this->em = $em;
        $this->userRepository = $userRepository;
        $this->jwtManager = $jwtManager;
        $this->tokenStorageInterface = $tokenStorageInterface;
        $this->posts = $posts;
        $this->hashtagRepository = $hashtagRepository;
        $this->postCommentRepository = $postCommentRepository;
    }

    /**
     * @param ResolveInfo $info
     * @param $value
     * @param Argument $args
     * @return mixed
     */
    public function __invoke(ResolveInfo $info, $value, Argument $args)
    {
        $method = $info->fieldName;
        return $this->$method($value, $args);
    }

    /**
     * @param string $id
     * @return null|Post
     */
    public function resolve(string $id)
    {
        return $this->em->find(Post::class, $id);
    }

    /**
     * @param Post $post
     * @return string
     */
    public function postId(Post $post) :string
    {
        return $post->getId();
    }

    /**
     * @param Post $post
     * @return string
     */
    public function content(Post $post) :string
    {
        return $post->getContent();
    }

    /**
     * @param Post $post
     * @return string
     */
    public function publishedAt(Post $post) :string
    {
        return $post->getPublishedAt()->format(self::POST_DATE_FORMAT);
    }

    /**
     * @param Post $post
     * @return User|null
     */
    public function author(Post $post)
    {
        return $post->getAuthor();
    }

    /**
     * @param Post $post
     * @return Collection
     */
    public function hashtags(Post $post)
    {
        return $post->getHashtags();
    }
}
You can notice that when we are resolving posts from User, we return a Connection (because of the relay Connection from our graphQL types) as for hashtags from a Post, we return a Collection which is totally different.
There there, the HashtagResolver :
<?php

namespace App\GraphQL\Resolver;

use App\Entity\Hashtag;
use Doctrine\Common\Collections\Collection;
use Doctrine\ORM\EntityManagerInterface;
use GraphQL\Type\Definition\ResolveInfo;
use Overblog\GraphQLBundle\Definition\Argument;
use Overblog\GraphQLBundle\Definition\Resolver\ResolverInterface;
use Overblog\GraphQLBundle\Relay\Connection\Output\Connection;
use Overblog\GraphQLBundle\Relay\Connection\Paginator;

class HashtagResolver implements ResolverInterface
{
    /**
     * @var EntityManagerInterface $em
     */
    protected $em;

    /**
     * HashtagResolver constructor.
     * @param EntityManagerInterface $em
     */
    public function __construct(EntityManagerInterface $em)
    {
        $this->em = $em;
    }

    /**
     * @param ResolveInfo $info
     * @param $value
     * @param Argument $args
     * @return mixed
     */
    public function __invoke(ResolveInfo $info, $value, Argument $args)
    {
        $method = $info->fieldName;
        return $this->$method($value, $args);
    }

    /**
     * @param string $name
     * @return object
     */
    public function resolve(string $name)
    {
        $name = strtolower($name);
        return $this->em->getRepository(Hashtag::class)->findOneBy(['name' => $name]);
    }

    /**
     * @param Hashtag $hashtag
     * @return string
     */
    public function name(Hashtag $hashtag): string
    {
        return $hashtag->getName();
    }

    /**
     * @param Hashtag $hashtag
     * @param Argument $args
     * @return Connection
     */
    public function posts(Hashtag $hashtag, Argument $args): Connection
    {
        $posts = $hashtag->getPost();
        $paginator = new Paginator(function ($offset, $limit) use ($posts) {
            return $posts->slice($offset, $limit ?? 10);
        });

        return $paginator->auto($args, count($posts));
    }

    /**
     * @param Hashtag $hashtag
     * @return int
     */
    public function count(Hashtag $hashtag): int
    {
        return count($hashtag->getPost());
    }
}
Now that we have our graphQL types and our resolvers we can start querying some data in GraphiQL. You can generate a post, link it with your user and link to this post some hashtags.
GraphiQl : Query your data :
GraphiQL is a cool IDE for GraphQL queries and mutations. You have also an “electron” version, for windows. There is othre ones : in PostMan, in PHPStorm, Altair.
Oh I almost forgot : in config/routes/graphql.yaml we need to defile a prefix for our graphQL endpoint. By default, the endpoint is localhost. I rather like the localhost/graphql, according to my security.yaml. I can secure easily this pattern, and let others open like register.
#config/routes/graphql.yaml
overblog_graphql_endpoint:
    resource: "@OverblogGraphQLBundle/Resources/config/routing/graphql.yml"
    prefix: graphql
Nice we are FINALLY all set ![]() . On graphiql you can put
. On graphiql you can put localhost:8000/graphql/ (adapt it to your port obviously).
It should look like this:
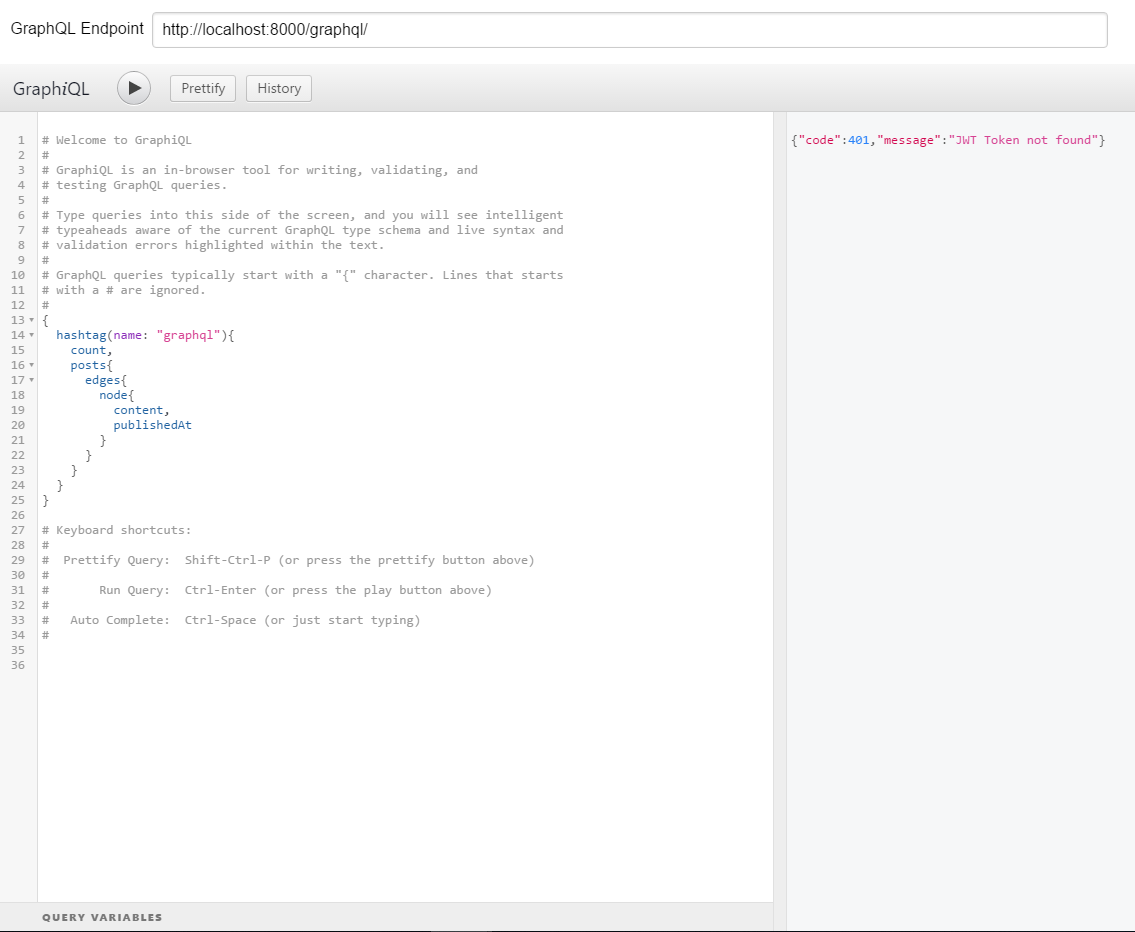
{"code":401,"message":"JWT Token not found"}
You get it :o ? We didn’t put any JWT token to our request, thus the reply is a forbidden access.
To add the token, you’ll have first to get the Token (Postman > POST localhost:PORT/login (with credentials) > Copy the token). Then you can click on the primary button on the top right side of GraphiQL : “Edit HTTP Headers”. Then you add a new Header named Authorization and for the value : Bearer [Token]. There is a space between “Bearer” and the token. Save!
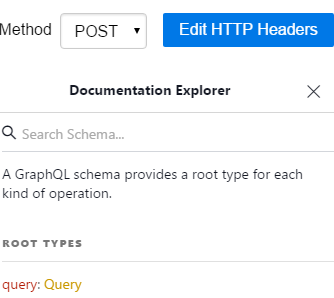
You can access your graphQL documentation thanks to GraphiQL.
Now we want to query a user by his username, with his posts, and the hashtags of his posts.
Thanks to GraphQL we can do it in one query :
{
  user(username: "youyouwhat"){
    email,
    posts{
      edges{
        node{
          content,
          publishedAt,
          hashtags{
            name,
            count
          }
        }
      }
    }
  }
}
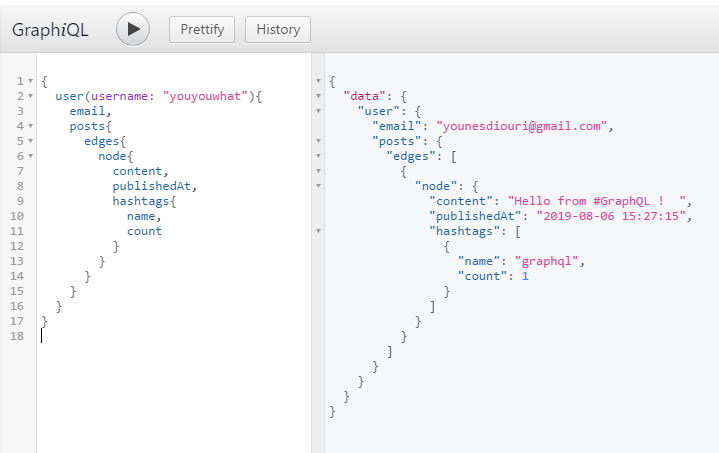
You can see that for relay connection, we used edges{node{attributes, as for simple array (hashtags) we just used the brackets.
Let’s move to the last part of this tutorial : The Mmmmmm-utations !
Mutations in GraphQL Symfony:
Mutation works exactly like queries ![]() .
.
Remember? In config/packages/graphql.yaml we added in the schema the Mutation value to the mutation key. We have then to specify a Mutation.yaml file in our config/graphql/types folder.
#config/graphql/types/Mutation.yaml

Mutation:
  type: "object"
  config:
    fields:
      createPost:
        type: CreatePostPayload!
        resolve: "@=mutation('createPost', [args['input']['content']])"
        args:
          input:
            type: CreatePostInput!
We are doing the mutation for the Post creation. We are defining the target mutation file (PostMutation) which contains an alias.
Then we have the return type CreatePostPayload that has to be defined in our Post.types.yaml file. It goes the same way for the input argument CreatePostInput.
The arguments args['input'] are the input arguments needed for the Post creation (in our case : content).
#config/graphql/types/Post.types.yaml

# ... our Post type

CreatePostInput:
  type: input-object
  config:
    fields:
      content:
        type: "String!"

CreatePostPayload:
  type: object
  config:
    fields:
      content:
        type: "String!"
      hashtags:
        type: "[Hashtag]"
The CreatePostInput takes in parameter one field : Content (of String type).
The CreatePostPayload is the response content from the graphQL mutation. It will return the content (to be displayed) and the relatives Hashtags ![]() . Why Hashtags ? Because we’ll take them into account in the
. Why Hashtags ? Because we’ll take them into account in the PostMutation.php create method.
Let’s give a look under the hood.
<?php
// src/GraphQL/Mutation/PostMutation.php

namespace App\GraphQL\Mutation;

use App\Entity\Hashtag;
use App\Entity\Post;
use App\Repository\HashtagRepository;
use App\Repository\UserRepository;
use Doctrine\ORM\EntityManagerInterface;
use Lexik\Bundle\JWTAuthenticationBundle\Services\JWTTokenManagerInterface;
use Overblog\GraphQLBundle\Definition\Resolver\AliasedInterface;
use Overblog\GraphQLBundle\Definition\Resolver\MutationInterface;
use Symfony\Component\Security\Core\Authentication\Token\Storage\TokenStorageInterface;

class PostMutation implements MutationInterface, AliasedInterface
{
    protected $em;
    protected $userRepository;
    protected $jwtManager;
    protected $tokenStorageInterface;
    protected $roomRepository;
    protected $hashtagRepository;

    /**
     * PostMutation constructor.
     * @param EntityManagerInterface $em
     * @param UserRepository $userRepository
     * @param HashtagRepository $hashtagRepository
     * @param TokenStorageInterface $tokenStorageInterface
     * @param JWTTokenManagerInterface $jwtManager
     */
    public function __construct(
        EntityManagerInterface $em,
        UserRepository $userRepository,
        HashtagRepository $hashtagRepository,
        TokenStorageInterface $tokenStorageInterface,
        JWTTokenManagerInterface $jwtManager
    ) {
        $this->em = $em;
        $this->userRepository = $userRepository;
        $this->jwtManager = $jwtManager;
        $this->tokenStorageInterface = $tokenStorageInterface;
        $this->hashtagRepository = $hashtagRepository;
    }

    public function create(string $content, string $room)
    {
        $decodedJwtToken = $this->jwtManager->decode($this->tokenStorageInterface->getToken());
        $user = $this->userRepository->find($decodedJwtToken["id"]);
        $post = new Post();
        $post->setContent($content);
        $hashtagNumber = preg_match_all("/#(\w+)/", $content, $matches);
        if($hashtagNumber>0) {
            foreach($matches[1] as $key=>$value){
                $value = strtolower($value);
                $hashtag = $this->hashtagRepository->findOneBy(["name" => $value]);
                if ($hashtag === null) {
                    $hashtag = new Hashtag();
                    $hashtag->setName($value);
                    $this->em->persist($hashtag);
                }
                $post->addHashtag($hashtag);
            }
        }
        $post->setAuthor($user);
        $this->em->persist($post);
        $this->em->flush();

        return $post;
    }

    /**
     * {@inheritdoc}
     */
    public static function getAliases()
    {
        return [
            'create' => 'createPost'
        ];
    }
}
This is a good example of what we can do in a mutation. We are getting the author from the Token “id” key (I am using in this case the repository which is wrong ;) ). We are parsing the content to get the hashtags (we can use a unique constriant key to avoid querying all the hashtags everytime). The published date is set by default in the Post entity. Please note the Alias beneath related to our Mutation.types.yaml.
Mutations with GraphiQL:
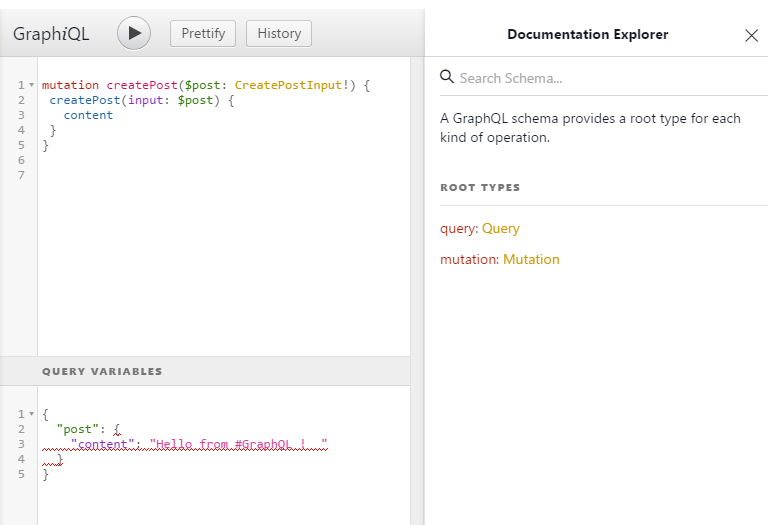
There is a bottom panel “Query Variables” for the query variable “CreatePostInput” $post. Now let’s give it a try!

:o There is no hashtags in return? It’s perfectly normal, we only specify that we wanted the content ! To get the Hashtags, you’ll have to use the following mutation :
mutation createPost($post: CreatePostInput!) {
 createPost(input: $post) {
   content,
  hashtags{
    name
  }
 }
}
And you’ll have in return (an example):
{
  "data": {
    "createPost": {
      "content": "Hello from #Wuuut !  ",
      "hashtags": [
        {
          "name": "wuuut"
        }
      ]
    }
  }
}
Tadaaaa!
I hope this little story helped with the understanding of GraphQL Symfony, the possibilities you can have by having a Symfony 4 API (JWT, security etc.).
As for me, I used it for an app with a heavy logic and I must say I wasn’t dissapointed with the performances. Of course we absolutely need to be careful about the cache, and when it is mandatory to query from the DB (the JWT User is a good example).
Peace.
Comments